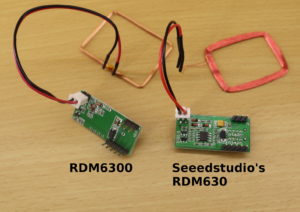
Seeedstudio’s RDM630 and the RDM6300 are two different types of RFID readers, even though they often get mixed up. Besides the similar names, another reason for the confusion might be that they share the same pin layout and transfer protocol. According to my knowledge, besides the same technical functionality, they have nothing else in common (like same manufacturer, predecessor/successor version, etc.). Usually, you should be able to purchase Seeedstudio’s RDM630 for about 10-15$ and the RDM6300 for about 1-3$. In my opinion, the price difference can be easily justified as the RDM630 is more robust and allows much higher reading distances.
Both readers work at a frequency of 125 kHz and enable to read EM4100-compatible tags. Other tags (for example EM4305 tags) do not (or might not) work with these readers.
In this tutorial, I demonstrate how to use the RDM6300 and the RDM630 with an Arduino Uno. Luckily, both RFID readers use the same protocol via a serial connection. As a result, the same source code can be used to make both readers work. Therefore, regardless of whether you own an RDM630 or RDM6300, this tutorial should be of use to you if you want to make it work with an Arduino.
List of materials:
* If you are looking for an RDM630, please keep in mind that many offers are wrongly labeled. You can find many products that are advertised as “RDM630”, although they are of type RDM6300. Therefore, take a close look at the pictures.
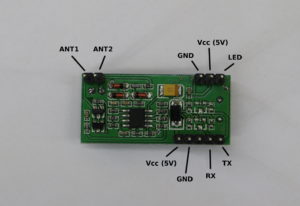
Pin layout RDM630 / RDM6300:
In total, the RDM630/RDM6300 has 9 pins, where Vcc and GND exist two times. The Vcc pin must be connected to a 5V DC. ANT1 and ANT2 are used to connect an antenna to the board. Typically, the RDM630 as well as the RDM6300 already come with an antenna. Nonetheless, it is possible to switch the antenna, for example to a custom-made antenna. TX is used to transmit data and RX is used to retrieve data. The LED pin can be used to quickly lookup whether an RFID tag was successfully read. If RFID tag is not present, the LED pin is at 5V (HIGH). If an RFID was read, the LED pin goes to 0V (LOW) for some moments (yes, it goes from HIGH to LOW!).
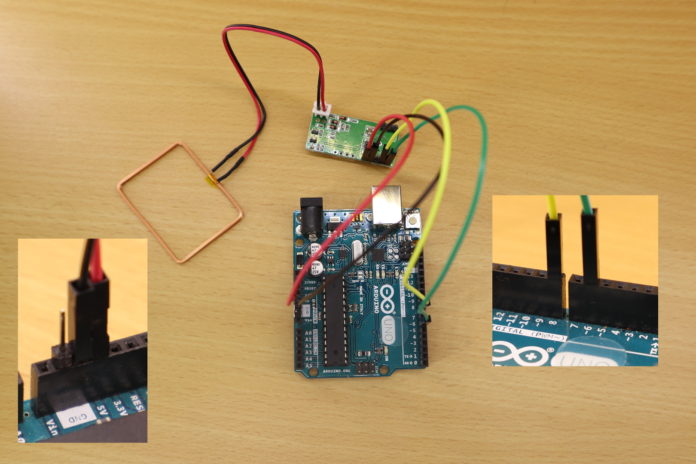
Wiring to Arduino Uno:
In this tutorial, four pins of the RDM630/RDM6300 are wired to the Arduino Uno. Vcc has to be connected to the Arduino’s 5V pin (red wire) and GND to the Arduino’s GND (black wire). The TX pin has to be connected to digital pin #6 (green wire). Basically, the RX pin is not required as we do not send data to the RFID module in this tutorial. For the sake of completeness, RX is connected to digital pin #8 (yellow wire). Lastly, the antenna is connected to ANT1 and ANT2 (polarity does not matter).
Example source code:
As mentioned before, the same source code can be used with both models (I tested the code with both models). Basically, when an RFID tag was detected the RDM630/RDM6300 sends a frame with 14 bytes: head [1 byte], data [10 byte], checksum [2 byte], and tail [1 byte]. The head (or preamble) is always 0x02. Similarly, the tail is always 0x03. The data field contains ASCII-encoded HEX values. Sometimes, manufacturers tend to split the RFID tag data field into two parts: version and tag. Therefore, depending on your RFID tag type, the first two bytes of data might be the version and the other 8 bytes the actual RFID tag. I considered this in my source code. In order to calculate the checksum from the data field, one has to perform an XOR-operation over all data entries.
// (c) Michael Schoeffler 2018, http://www.mschoeffler.de
#include <SoftwareSerial.h>

const int BUFFER_SIZE = 14; // RFID DATA FRAME FORMAT: 1byte head (value: 2), 10byte data (2byte version + 8byte tag), 2byte checksum, 1byte tail (value: 3)
const int DATA_SIZE = 10; // 10byte data (2byte version + 8byte tag)
const int DATA_VERSION_SIZE = 2; // 2byte version (actual meaning of these two bytes may vary)
const int DATA_TAG_SIZE = 8; // 8byte tag
const int CHECKSUM_SIZE = 2; // 2byte checksum

SoftwareSerial ssrfid = SoftwareSerial(6,8);

uint8_t buffer[BUFFER_SIZE]; // used to store an incoming data frame
int buffer_index = 0;

void setup() {
 Serial.begin(9600);

 ssrfid.begin(9600);
 ssrfid.listen();

 Serial.println("INIT DONE");
}

void loop() {
  if (ssrfid.available() > 0){
    bool call_extract_tag = false;

    int ssvalue = ssrfid.read(); // read
    if (ssvalue == -1) { // no data was read
      return;
    }

    if (ssvalue == 2) { // RDM630/RDM6300 found a tag => tag incoming
      buffer_index = 0;
    } else if (ssvalue == 3) { // tag has been fully transmitted
      call_extract_tag = true; // extract tag at the end of the function call
    }

    if (buffer_index >= BUFFER_SIZE) { // checking for a buffer overflow (It's very unlikely that an buffer overflow comes up!)
      Serial.println("Error: Buffer overflow detected!");
      return;
    }

    buffer[buffer_index++] = ssvalue; // everything is alright => copy current value to buffer

    if (call_extract_tag == true) {
      if (buffer_index == BUFFER_SIZE) {
        unsigned tag = extract_tag();
      } else { // something is wrong... start again looking for preamble (value: 2)
        buffer_index = 0;
        return;
      }
    }
  }
}

unsigned extract_tag() {
    uint8_t msg_head = buffer[0];
    uint8_t *msg_data = buffer + 1; // 10 byte => data contains 2byte version + 8byte tag
    uint8_t *msg_data_version = msg_data;
    uint8_t *msg_data_tag = msg_data + 2;
    uint8_t *msg_checksum = buffer + 11; // 2 byte
    uint8_t msg_tail = buffer[13];

    // print message that was sent from RDM630/RDM6300
    Serial.println("--------");

    Serial.print("Message-Head: ");
    Serial.println(msg_head);

    Serial.println("Message-Data (HEX): ");
    for (int i = 0; i < DATA_VERSION_SIZE; ++i) {
      Serial.print(char(msg_data_version[i]));
    }
    Serial.println(" (version)");
    for (int i = 0; i < DATA_TAG_SIZE; ++i) {
      Serial.print(char(msg_data_tag[i]));
    }
    Serial.println(" (tag)");

    Serial.print("Message-Checksum (HEX): ");
    for (int i = 0; i < CHECKSUM_SIZE; ++i) {
      Serial.print(char(msg_checksum[i]));
    }
    Serial.println("");

    Serial.print("Message-Tail: ");
    Serial.println(msg_tail);

    Serial.println("--");

    long tag = hexstr_to_value(msg_data_tag, DATA_TAG_SIZE);
    Serial.print("Extracted Tag: ");
    Serial.println(tag);

    long checksum = 0;
    for (int i = 0; i < DATA_SIZE; i+= CHECKSUM_SIZE) {
      long val = hexstr_to_value(msg_data + i, CHECKSUM_SIZE);
      checksum ^= val;
    }
    Serial.print("Extracted Checksum (HEX): ");
    Serial.print(checksum, HEX);
    if (checksum == hexstr_to_value(msg_checksum, CHECKSUM_SIZE)) { // compare calculated checksum to retrieved checksum
      Serial.print(" (OK)"); // calculated checksum corresponds to transmitted checksum!
    } else {
      Serial.print(" (NOT OK)"); // checksums do not match
    }

    Serial.println("");
    Serial.println("--------");

    return tag;
}

long hexstr_to_value(char *str, unsigned int length) { // converts a hexadecimal value (encoded as ASCII string) to a numeric value
  char* copy = malloc((sizeof(char) * length) + 1);
  memcpy(copy, str, sizeof(char) * length);
  copy[length] = '\0';
  // the variable "copy" is a copy of the parameter "str". "copy" has an additional '\0' element to make sure that "str" is null-terminated.
  long value = strtol(copy, NULL, 16);  // strtol converts a null-terminated string to a long value
  free(copy); // clean up
  return value;
}
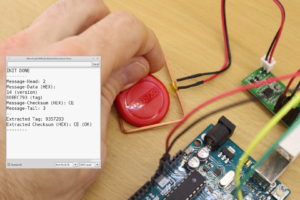
If you execute the source code and hold an RFID tag close to the antenna, the Arduino IDE’s serial monitor should output something like this:
Video tutorial:
Sir, this is an excellent tutorial, for both hardware and software.
With a few data type changes and casts, I got your code working on a Particle Photon with the RDM6300.
Thank you a lot and congratulations for a great tutorial!
hey, I just wanted to let you know that your video made me realize that I was wiring the rfid scanner backwards (I thought that square pin meant pin 1, so I thought the pins were flipped on the datasheet. So, RX and TX were wired like +5 and GND, and +5 was hooked up to TX. Even with the wrong wiring, the scanner turned on and I was able to get an LED reaction from putting a tag near the antennae. It didn’t flicker off though, it just brightened). I have been stuck on this scanner for actual months now and it was the wiring the whole time, so thank you for posting this because I might not have thought to try that had I not stumbled upon this.
Good writing! That’s what I was looking for! Greetings from Hungary!
You did not live in vain! :-)
I’m developing an application that includes reading RFID …
Great work!
dear Mr Schoeffler,
Thank you very much for this very learnfull and crystal clear video. However, I used the RDM 6300 and your Arduino sketch to read a HID keyfob proxkey III (125 kHz), but nothing happened. The LED doesn’t react either.
Can you give me a hint what I did wrong?
Kind regards, Raggy Campagne
Can read proxkey3 you need another rfid reader..
125 Khz. RFID tags.
Thank you so much sir. The best project is your’s.
hi,
Thanks for the comparison, very nice.
Can you give some information on the external antenna you created? what is the inductance and other parameters?
regards,
appeared an error in line 103 ( if (checksum == hexstr_to_value(msg_checksum, CHECKSUM_SIZE))), could you help me?
/home/jou/Cloud/VIVACONDOMINIO/ELEVADOR/Arduino/rdm6300_nfc/rdm6300_nfc.ino: In function ‘unsigned int extract_tag()’:
rdm6300_nfc:92: error: invalid conversion from ‘uint8_t* {aka unsigned char*}’ to ‘char*’ [-fpermissive]
long tag = hexstr_to_value(msg_data_tag, DATA_TAG_SIZE);
^
rdm6300_nfc:115: error: initializing argument 1 of ‘long int hexstr_to_value(char*, unsigned int)’ [-fpermissive]
long hexstr_to_value(char *str, unsigned int length) { // converts a hexadecimal value (encoded as ASCII string) to a numeric value
^
rdm6300_nfc:98: error: invalid conversion from ‘uint8_t* {aka unsigned char*}’ to ‘char*’ [-fpermissive]
long val = hexstr_to_value(msg_data + i, CHECKSUM_SIZE);
^
rdm6300_nfc:115: error: initializing argument 1 of ‘long int hexstr_to_value(char*, unsigned int)’ [-fpermissive]
long hexstr_to_value(char *str, unsigned int length) { // converts a hexadecimal value (encoded as ASCII string) to a numeric value
^
rdm6300_nfc:103: error: invalid conversion from ‘uint8_t* {aka unsigned char*}’ to ‘char*’ [-fpermissive]
if (checksum == hexstr_to_value(msg_checksum, CHECKSUM_SIZE)) { // compare calculated checksum to retrieved checksum
^
rdm6300_nfc:115: error: initializing argument 1 of ‘long int hexstr_to_value(char*, unsigned int)’ [-fpermissive]
long hexstr_to_value(char *str, unsigned int length) { // converts a hexadecimal value (encoded as ASCII string) to a numeric value
^
/home/jou/Cloud/VIVACONDOMINIO/ELEVADOR/Arduino/rdm6300_nfc/rdm6300_nfc.ino: In function ‘long int hexstr_to_value(char*, unsigned int)’:
rdm6300_nfc:116: error: invalid conversion from ‘void*’ to ‘char*’ [-fpermissive]
char* copy = malloc((sizeof(char) * length) + 1);
^
exit status 1
invalid conversion from ‘uint8_t* {aka unsigned char*}’ to ‘char*’ [-fpermissive]
Have you resolved? Same problem here.
1)change ‘uint8_t’ to ‘char’,all of them
2)modify into this : char* copy = (char*)malloc((sizeof(char) * length) + 1);
Tested on ESP32 with no problem.
Thanks!
Thank you so much for your tutorial. Very informative and possibly saved me a lot of headaches. Looks like the RDM6300 is not a very good reader. Problem, I am having trouble finding the RMD630 though. I am planning on using RFID under the laying boxes for my hens so I can see which of the girls is laying, and when, but I don’t think the 6300 will work well enough to be consistent.
Hi,
were you able to implement your project? I want to do the same, can you give me some tips?
Thanks for help
Lea
Greetings !
First of all, thank you very much for instructions :)
Could it be possible to write down more precisely how “Extracted Tag number: 9357203” occurs.
If possible then step by step.
With respect.
This is great. I have been struggling with getting this working and your code is flawless. By chance do you have write examples that I can build on
The process is being repeated many times , when i read the card and leave it for some , it repeats itself , the idea is , i’m going to use SD Card for logs in my product , i need to know what’s the issue .
Hello Michael:
I’m beginner with Arduino and i’m looking for a RFID reader that works con RFID Pet Chip (EM4305). What RFID reader do you recomend?
Das Programm funktioniert sehr gut. Leider habe ich das Problem das ich ein Relay schalten möchte und wenn der Chip lange davor gehalten, wird steuert das Relay mehrfach an.
Ich habe meine Abfrage welche ID richtig ist nach Zeile 103 gesetzt. Was kann ich tun, damit die mehrfach Ansteuerung nicht geschied oder mindestens nur wenn man den Chip mehr als z.B. 20 Sekunden davor halten wird ?
Thanks, this was helpful. How would one detect the absence of a tag? For example, controlling machinery where the tag must be present at all times.
E.g. by adding a condition that checks whether any (or a specific) tag has not been read within the last second.
Hi !
I am using a RDM6300 to read 125 khz tag with the initial antenna and i would like to make an other antenna for increase the distance of detection. Is it possible with this kid of RFID. My project is to read 125khz rfid tag at 50 cm or more if it’s possible of course. Have ever try something like this ?
Thanks for the help.
Xavier
My guess is that 50cm will not work with the RDM6300. Also heavy optimization won’t make it possible to reach 50cm.
Thank you very much for this tutorial!
I got RDM6300 module and needed a quick code & explaination for testing it. Used your instruction and sample code. Worked on first try! Thanks for sharing. have a nice day!
[…] https://www.mschoeffler.de/2018/01/05/arduino-tutorial-how-to-use-the-rdm630-rdm6300-rfid-reader/ […]
[…] If you look up my tutorials you can find many of them: For example, KMR-1.8 SPI (TFT Display), RDM630/RDM6300 (RFID Reader), GY-521/MPU-6050 […]
The tutorial is great, but i have one issue.
How i can stop reading after the first read.
If i do not move the hand fast , it will print 5-10 readings , one after other.
Thank you
First comment is reading. It continuously read if you do not remove the tag. It is annoying. Normally should stops after first reading. The second issue is about display. I would like to have a full 14 bytes display beside the calculation to decimal. I want to store all the bytes on a eeprom as hex bytes and not decimal number. Can you add a line to display the hex bytes readed ? thank you.
Simple. Just need to check for an elapsed time since the last scan. Whipped this up fast:
// (c) Michael Schoeffler 2018, http://www.mschoeffler.de
#include
const int BUFFER_SIZE = 14; // RFID DATA FRAME FORMAT: 1byte head (value: 2), 10byte data (2byte version + 8byte tag), 2byte checksum, 1byte tail (value: 3)
const int DATA_SIZE = 10; // 10byte data (2byte version + 8byte tag)
const int DATA_VERSION_SIZE = 2; // 2byte version (actual meaning of these two bytes may vary)
const int DATA_TAG_SIZE = 8; // 8byte tag
const int CHECKSUM_SIZE = 2; // 2byte checksum
const unsigned long WAIT_TIME = 3000;
SoftwareSerial ssrfid = SoftwareSerial(6,8);
uint8_t buffer[BUFFER_SIZE]; // used to store an incoming data frame
long LastTag = 0;
unsigned long Time;
unsigned long LastRead;
int buffer_index = 0;
void setup() {
Serial.begin(9600);
ssrfid.begin(9600);
ssrfid.listen();
Serial.println(“INIT DONE”);
}
void loop() {
Time = millis();
if (ssrfid.available() > 0){
bool call_extract_tag = false;
int ssvalue = ssrfid.read(); // read
if (ssvalue == -1) { // no data was read
return;
}
if (ssvalue == 2) { // RDM630/RDM6300 found a tag => tag incoming
buffer_index = 0;
} else if (ssvalue == 3) { // tag has been fully transmitted
call_extract_tag = true; // extract tag at the end of the function call
}
if (buffer_index >= BUFFER_SIZE) { // checking for a buffer overflow (It’s very unlikely that an buffer overflow comes up!)
Serial.println(“Error: Buffer overflow detected!”);
return;
}
buffer[buffer_index++] = ssvalue; // everything is alright => copy current value to buffer
if (call_extract_tag == true) {
if (buffer_index == BUFFER_SIZE) {
unsigned tag = extract_tag();
} else { // something is wrong… start again looking for preamble (value: 2)
buffer_index = 0;
return;
}
}
}
}
unsigned extract_tag() {
uint8_t msg_head = buffer[0];
uint8_t *msg_data = buffer + 1; // 10 byte => data contains 2byte version + 8byte tag
uint8_t *msg_data_version = msg_data;
uint8_t *msg_data_tag = msg_data + 2;
uint8_t *msg_checksum = buffer + 11; // 2 byte
uint8_t msg_tail = buffer[13];
long tag = hexstr_to_value(msg_data_tag, DATA_TAG_SIZE);
if(LastTag == 0){
//Serial.println(“New tag was read!”);
LastTag = tag;
LastRead = Time + WAIT_TIME;
}else if(tag == LastTag){
//Serial.println(“Tag was previously read tag. Abort!”);
if (Time = LastRead){
//Serial.println(“Timeout expired. Reset tag and timer.”);
LastTag = tag;
LastRead = Time + WAIT_TIME;
}
} else{
//Serial.println(“New tag read! Reset timer and LastTag.”);
LastTag = tag;
LastRead = Time + WAIT_TIME;
}
// print message that was sent from RDM630/RDM6300
//Serial.println(“——–“);
//Serial.print(“Message-Head: “);
//Serial.println(msg_head);
//Serial.println(“Message-Data (HEX): “);
for (int i = 0; i < DATA_VERSION_SIZE; ++i) {
Serial.print(char(msg_data_version[i]));
}
//Serial.println(" (version)");
for (int i = 0; i < DATA_TAG_SIZE; ++i) {
//Serial.print(char(msg_data_tag[i]));
}
//Serial.println(" (tag)");
//Serial.print("Message-Checksum (HEX): ");
for (int i = 0; i < CHECKSUM_SIZE; ++i) {
//Serial.print(char(msg_checksum[i]));
}
//Serial.println("");
//Serial.print("Message-Tail: ");
//Serial.println(msg_tail);
//Serial.println("–");
//Serial.print("Extracted Tag: ");
Serial.print(tag);
long checksum = 0;
for (int i = 0; i < DATA_SIZE; i+= CHECKSUM_SIZE) {
long val = hexstr_to_value(msg_data + i, CHECKSUM_SIZE);
checksum ^= val;
}
//Serial.print("Extracted Checksum (HEX): ");
//Serial.print(checksum, HEX);
if (checksum == hexstr_to_value(msg_checksum, CHECKSUM_SIZE)) { // compare calculated checksum to retrieved checksum
Serial.println("?PASS"); // calculated checksum corresponds to transmitted checksum!
} else {
Serial.println("?FAIL"); // checksums do not match
}
//Serial.println("");
//Serial.println("——–");
return tag;
}
long hexstr_to_value(char *str, unsigned int length) { // converts a hexadecimal value (encoded as ASCII string) to a numeric value
char* copy = malloc((sizeof(char) * length) + 1);
memcpy(copy, str, sizeof(char) * length);
copy[length] = '\0';
// the variable "copy" is a copy of the parameter "str". "copy" has an additional '\0' element to make sure that "str" is null-terminated.
long value = strtol(copy, NULL, 16); // strtol converts a null-terminated string to a long value
free(copy); // clean up
return value;
}
The modifications here set "Time" to current uptime every loop, then whenever extract_tag is called, it will check and set the first ever tag read, then continuously check that with any incoming tag. If the tag is the same, it will then check to see if the uptime has elapsed the value set in "WAIT_TIME". If it hasn't, nothing will be printed and it will simply dump the data, once the time has elapsed, it will be okay to repeat the tag. If, however, a new tag was scanned while the timer hasn't elapsed, it will print the new tag and reset the timer. I have commented out all of the extra data, formatted more for receiving and proccessing the data, printing only a string containing Version (Hex), Tag (Decimal), and a "?" for splitting off "PASS" or "FAIL" for checksum verification.
Correction, I see the hex value of the tag. The only issue remain multiple read.
A very useful explanation of the two boards with a good description of the source code used. Thank you.
the RDM630 reader can read several tags at the same time?
Would it work with two antennas connected in series?
Hola
Pudes dar un ejemplo de escritura
gracias
Does anyone know of a tutorial for the EM4305 standard running at 134.2KHz? Or a pin layout for an FDX-B EM4305 board? Could I use the same Arduino code as for the EM4100?
I have fobs that go with a linear emerge systems. the readers are the linear 2 in 1 readers which say they are 125mhz. I have used your example code and it seems to work, but when I scan the fobs, nothing happens. can you point me in the right direction?
Thank for the tutorial. How can I adjust it to work with a 134.2 kHz RFID reader for animal tags?
Parameters:
1>. ingangsspanning: DC 5V
2>.Work stroom: 50mA
3>.Working frequentie: 134.2KHz
4>. geschikt type:ISO 11784/85 of compatibele kaart
5>.Format:FDX-B
6>. lees afstand:. Temperatuurbereik:-20 ° ~ 85 °
8>. werken luchtvochtigheid: 0%-95% RH
9>.Size:26*26*11mm
10>. antenne Grootte: 74*54*1.5mm
Feature:
Ontvanger data:03 84 12 DB FA E7 D5
Land ID:03 84
Nationale ID:12 DB FA E7 D5
Seriële protocol: AA 0F 08 00 03 84 12 DB FA E7 D5 81 BB
Start code:AA
Vaste code:0F 08 00
Tag data:03 84 12 DB FA E7 D5
Check code:B1
End code:BB
Check code berekening: 0F(XOR)08(XOR)00(XOR)03(XOR) 84(XOR)12(XOR)DB(XOR) FA(XOR)E7(XOR) d5 = 81
Solved (not tested yet, waiting for animal tag to test). Note; Check code: B1 should be 81
const int BUFFER_SIZE = 13; // RFID DATA FRAME FORMAT: 1byte head (AA=170), 10byte data (3byte fixed + 2byte country + 5byte tag), 1byte checksum, 1byte tail (BB=187)
const int DATA_SIZE = 10; // 7byte data (2byte country + 5byte tag) (03 84 + 12 DB FA E7 D5)
const int DATA_FIXED_SIZE = 3; // 3byte fixed (0F 08 00)
const int DATA_COUNTRY_SIZE = 2; // 2byte country (example 03 84)
const int DATA_TAG_SIZE = 5; // 5byte tag (example 12 DB FA E7 D5)
const int CHECKSUM_SIZE = 1; // 1byte checksum (example 81)
void loop() {
…
if (ssvalue == 170) { // EM4305RFID found a tag => tag incoming
buffer_index = 0;
} else if (ssvalue == 187) { // tag has been fully transmitted
call_extract_tag = true; // extract tag at the end of the function call
}
…
}
unsigned extract_tag() {
uint8_t msg_head = buffer[0];
uint8_t *msg_data = buffer + 1; // pointer to 10byte => data contains 3byte fixed + 2byte country + 5byte tag
uint8_t *msg_data_fixed = msg_data + 0; // 0
uint8_t *msg_data_country = msg_data + 3; // 3
uint8_t *msg_data_tag = msg_data + 5; // 3+2
uint8_t *msg_checksum = buffer + 11; // 1 byte
uint8_t msg_tail = buffer[12];
// print message that was sent from EM4305
Serial.println(“——–“);
Serial.print(“Message-Head: “);
Serial.println(msg_head);
Serial.println(“Message-fixed (HEX): “);
for (int i = 0; i < DATA_FIXED_SIZE; ++i) {
Serial.print(char(msg_data_fixed[i]));
}
Serial.println("Message-Data (HEX): ");
for (int i = 0; i < DATA_COUNTRY_SIZE; ++i) {
Serial.print(char(msg_data_country[i]));
}
Serial.println(" (version)");
for (int i = 0; i < DATA_TAG_SIZE; ++i) {
Serial.print(char(msg_data_tag[i]));
}
Serial.println(" (tag)");
Serial.print("Message-Checksum (HEX): ");
for (int i = 0; i < CHECKSUM_SIZE; ++i) {
Serial.print(char(msg_checksum[i]));
}
Serial.println("");
Serial.print("Message-Tail: ");
Serial.println(msg_tail);
Serial.println("–");
long tag = hexstr_to_value(msg_data_tag, DATA_TAG_SIZE);
Serial.print("Extracted Tag: ");
Serial.println(tag);
long checksum = 0;
for (int i = 0; i < DATA_SIZE; i+= CHECKSUM_SIZE) {
long val = hexstr_to_value(msg_data + i, CHECKSUM_SIZE);
checksum ^= val;
}
Serial.print("Extracted Checksum (HEX): ");
Serial.print(checksum, HEX);
if (checksum == hexstr_to_value(msg_checksum, CHECKSUM_SIZE)) { // compare calculated checksum to retrieved checksum
Serial.print(" (OK)"); // calculated checksum corresponds to transmitted checksum!
} else {
Serial.print(" (NOT OK)"); // checksums do not match
}
Serial.println("");
Serial.println("——–");
return tag;
}
Hi
With either of these 2 rfid readers is it possible to use more than 1 reader (say 5) going into Arduino (suitable model Arduino) .
probably 20 + reads per minute between all readers.
Instead of going to Arduino monitor the ‘reads’ go to MS Excel open spreadsheet ? Each reader to different column in Excel.
Thankyou
Charles Harris
Hi, i wanted to make an rfid antenna like yours. i just wanted to ask how are you able to make it and what were the materials?